Boobie Hat Pattern

This is the perfect hat for learning a variety of simple skills that you will use along your crochet journey. I feel very passionate about breastfeeding, and normalizing mothers being allowed to breastfeed in public without fear of being shamed and ridiculed. I have too many stories of people shaming myself and other women for breastfeeding our babies. That being said, this hat is what I like to call malicious compliance. “You don’t want to see my baby eat? Fine, here’s a replica of just my boob.”
I would love to see your finished products! Post your photos in the comments on my website or on social media and be sure to tag me!
For an Ad-Free Version of this pattern, you can purchase a PDF download from:
You can find a video tutorial of this pattern on my YouTube Channel:
You can find short tutorials of specific portions of the pattern on my TikTok, YouTube, and Instagram:
Important Notes
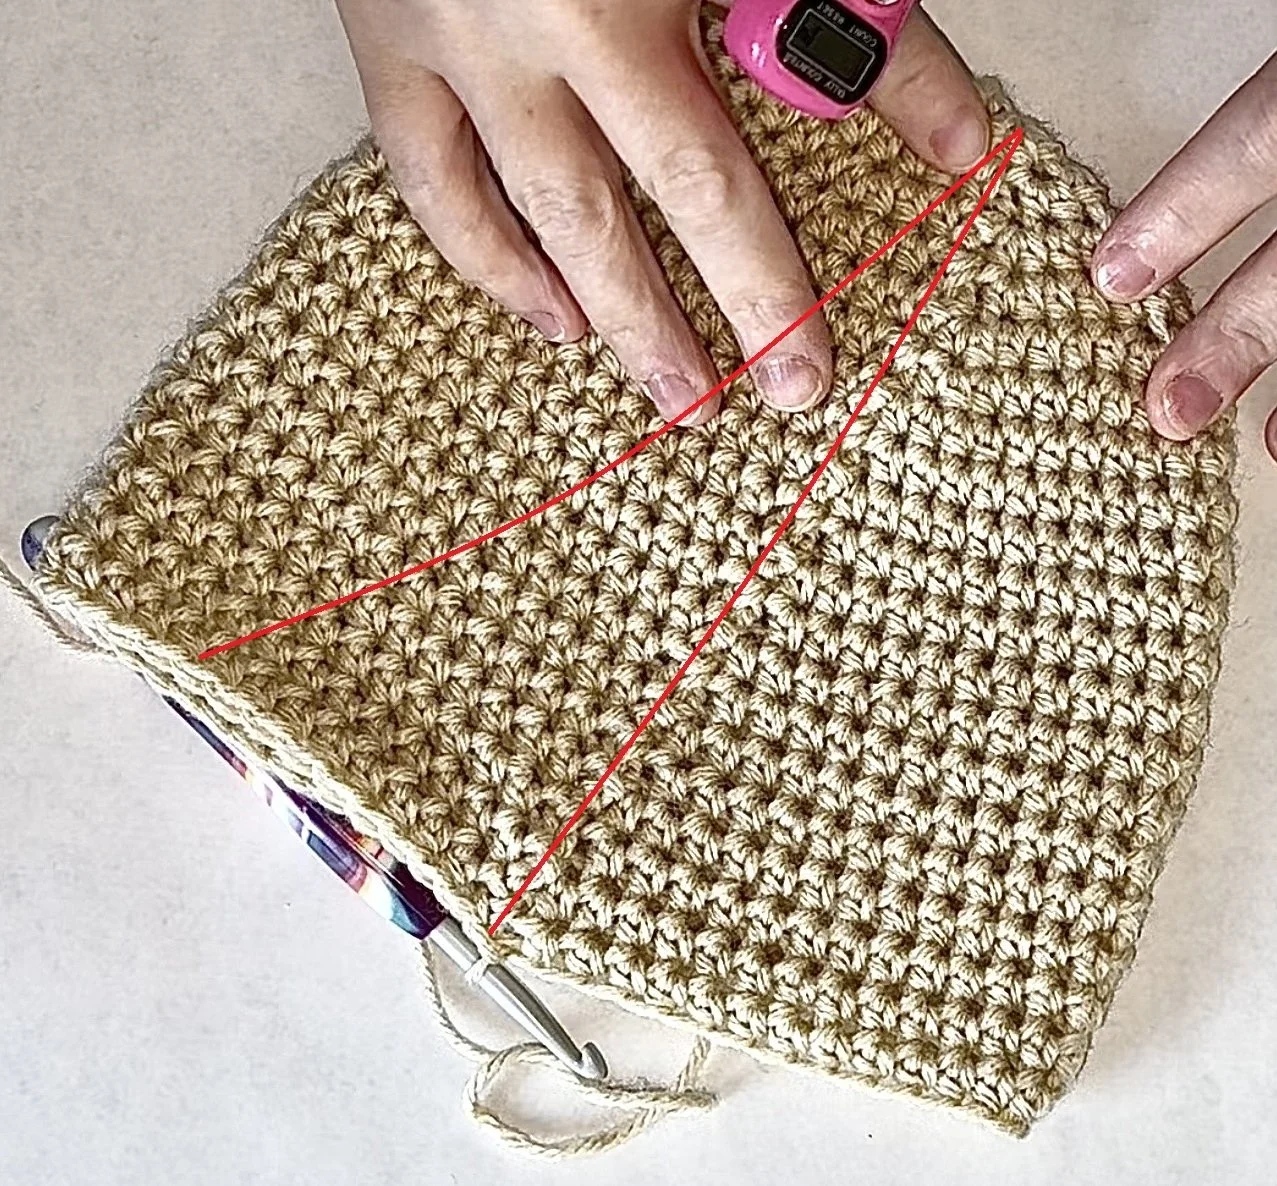
You will notice that each row alternates between where you put the first stitch of the round. The reason is because this method is going to give you a straight seam instead of a curved/diagonal seam.
I have included specific placements for where to sew the nipple onto the top of the hat, but if you have a different tension than I do that placement may be off a bit. The important thing to ensure is just that the nipple is flat and centered, not that it lines up with a specific round number.
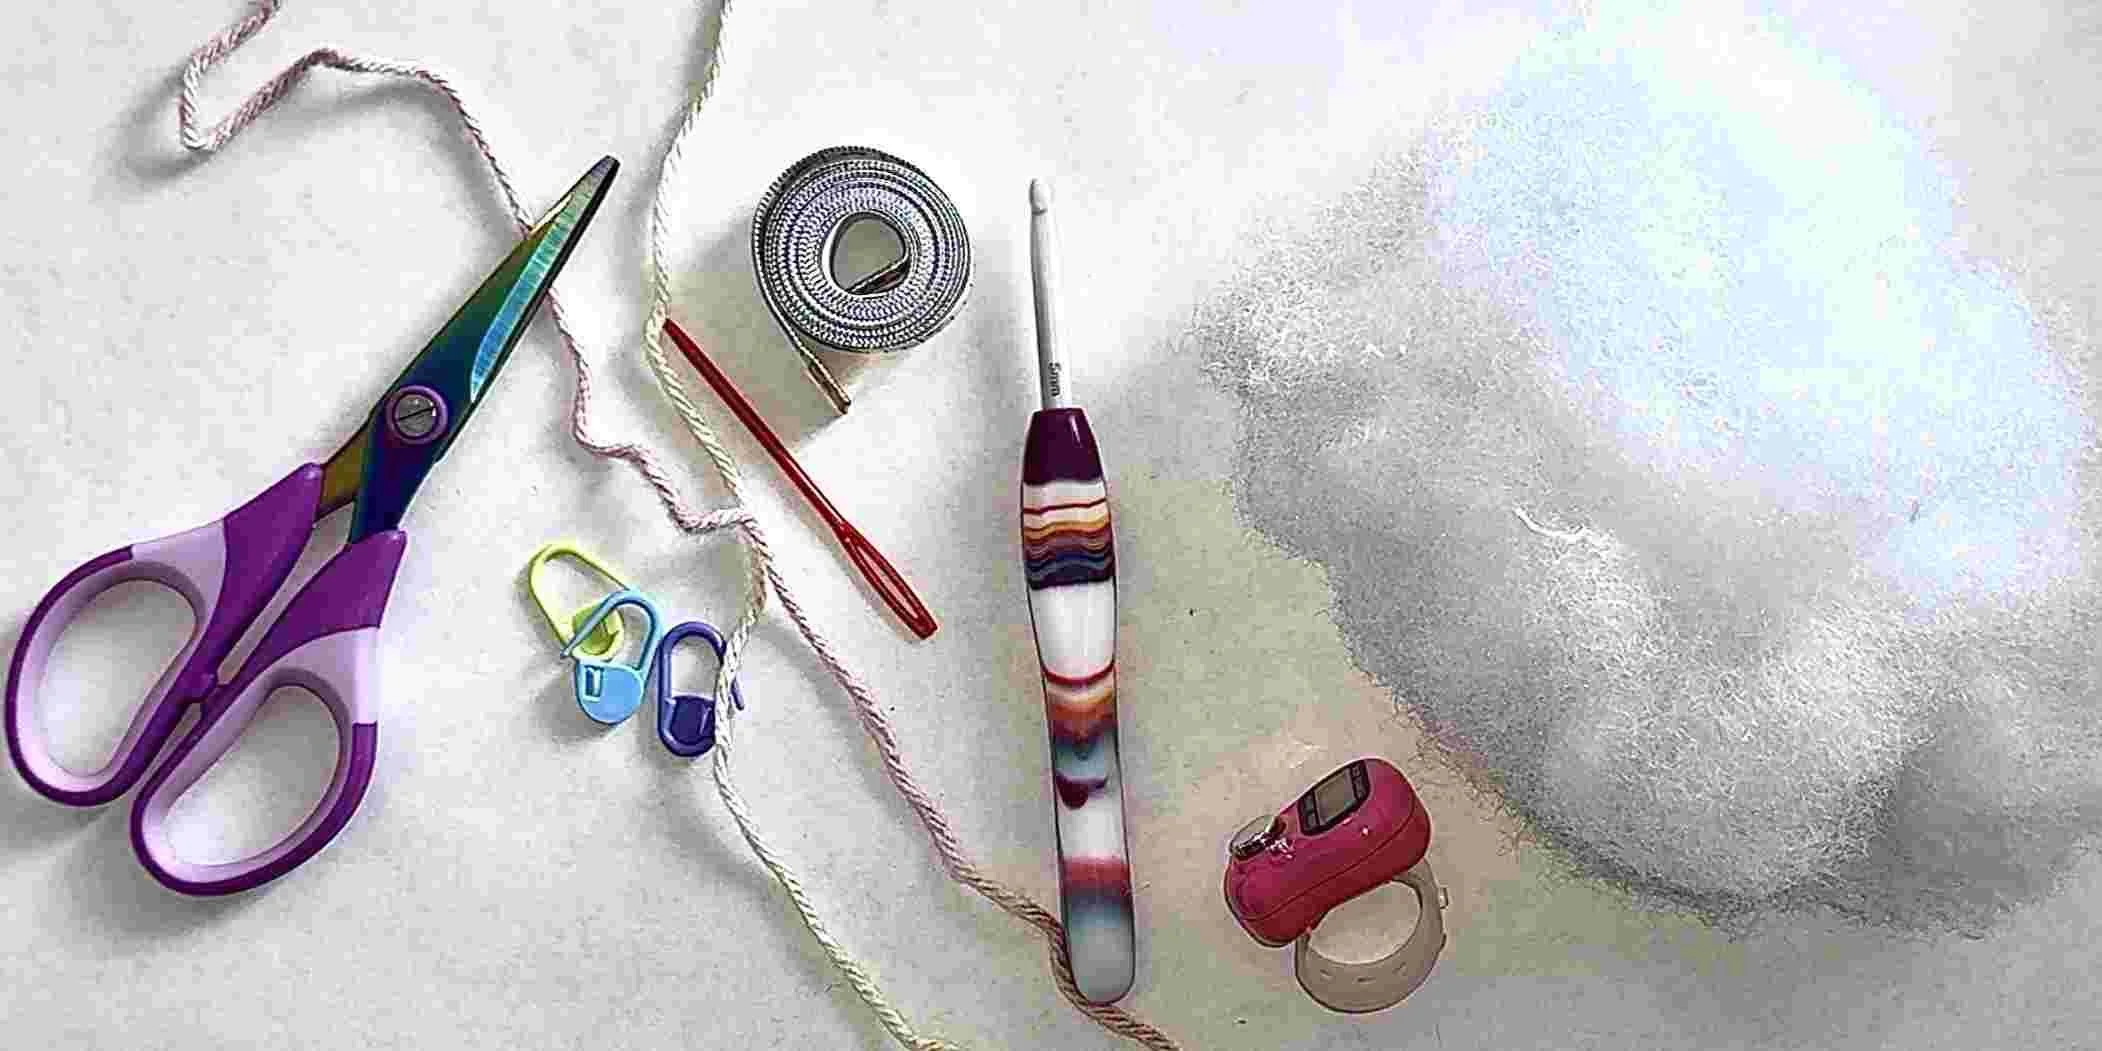
Materials
5 MM (H) Crochet Hook
Tapestry Needle
Stitch Counter
Stitch Markers
Scissors
Fiberfill
Two tones of yarn (one for the breast, and one for the nipple)
For the white breast I used the color “Heather” from Loops & Threads “Impeccable” line for the breast itself, and the color “Soft Rose” from Loops & Threads “Impeccable” line for the nipple.
For the black breast I used the color “Walnut” from Loops & Threads “Impeccable” line for the breast itself, and “Chocolate Brown” from Loops & Threads “Impeccable” line for the nipple.
Stitches (Short Hand) – U.S. Terminology
Ch (Chain)
St (Stitch)
Sk (Skip)
Ch Sp (Chain Space)
HDC (Half-Double Crochet)
Sl St (Slip Stitch)
Sc (Single Crochet)
Inc (Increase)
Size Guide
When starting a hat with HDC’s in the round, you can use the following guide to determine how many Inc Rounds to create for each size
Infant – 6 Inc rounds (48 St total in the round)
This is the size I made the black breast
Baby/Toddler – 7 Inc rounds (56 St total in the round)
This is the size I made the white breast
Toddler/Kid – 8 Inc rounds (64 St total in the round)
Average Adult – 9 Inc rounds (72 St total in the round)
Large Adult – 10 Inc rounds (80 St total in the round)
Pattern
Breast
For this portion of the hat you will need your 5mm crochet hook, yarn in the color you want the breast to be, and scissors.
Step 1: 8 HDC’s in the Magic Circle, Sl St in first HDC of the round (Not the Ch Sp) – 8 St total in the round
There are short videos on my youtube, TikTok and Instagram about how to make a slip stitch and how to make a magic circle. There is also a time stamp in my full length youtube tutorial of this pattern.
Magic Circle Alternative: If you find it too difficult to use the magic circle, an alternate method you could use is to Ch 4, Sl St in the first Ch and then start crocheting Step 2 in the ring that is created (Not the St’s themselves.)
Step 2: Ch 2, 2 HDC’s in fist St (same St as previous rows last Sl St); 2 HDC’s in next St, Repeat from 6 times; Sl St in first HDC – 16 St total in the round
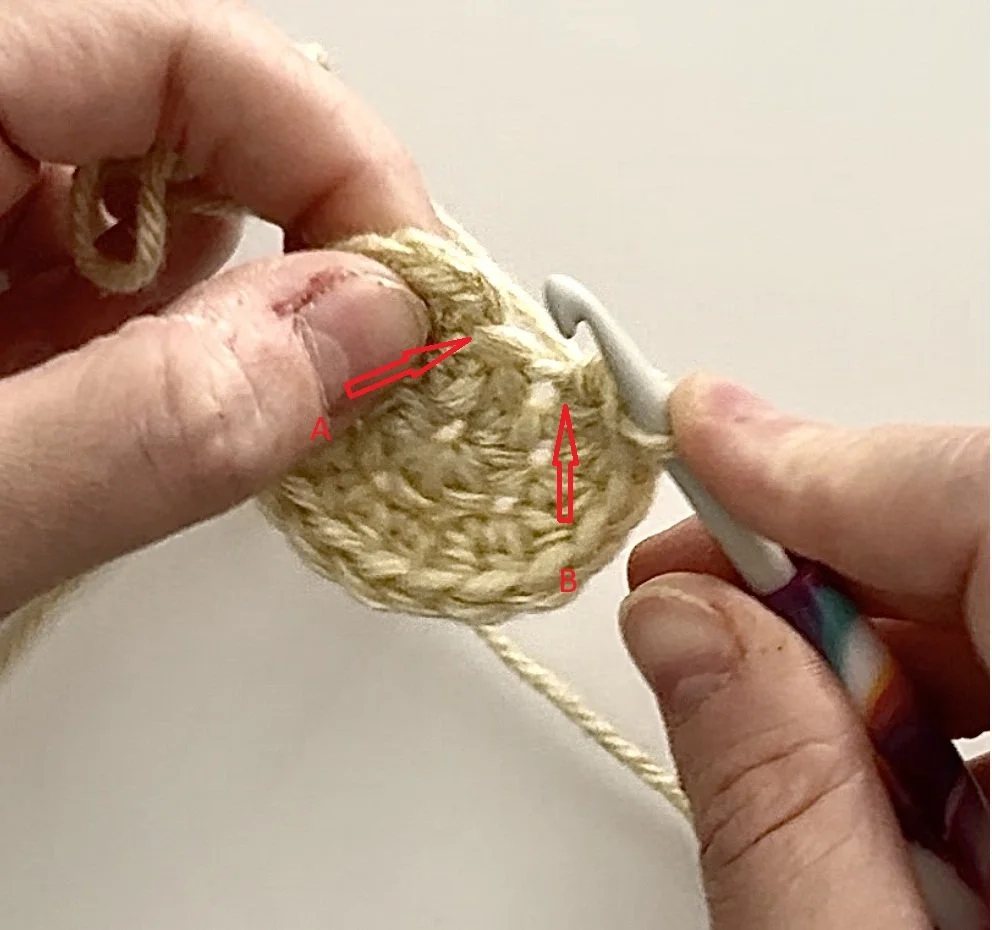
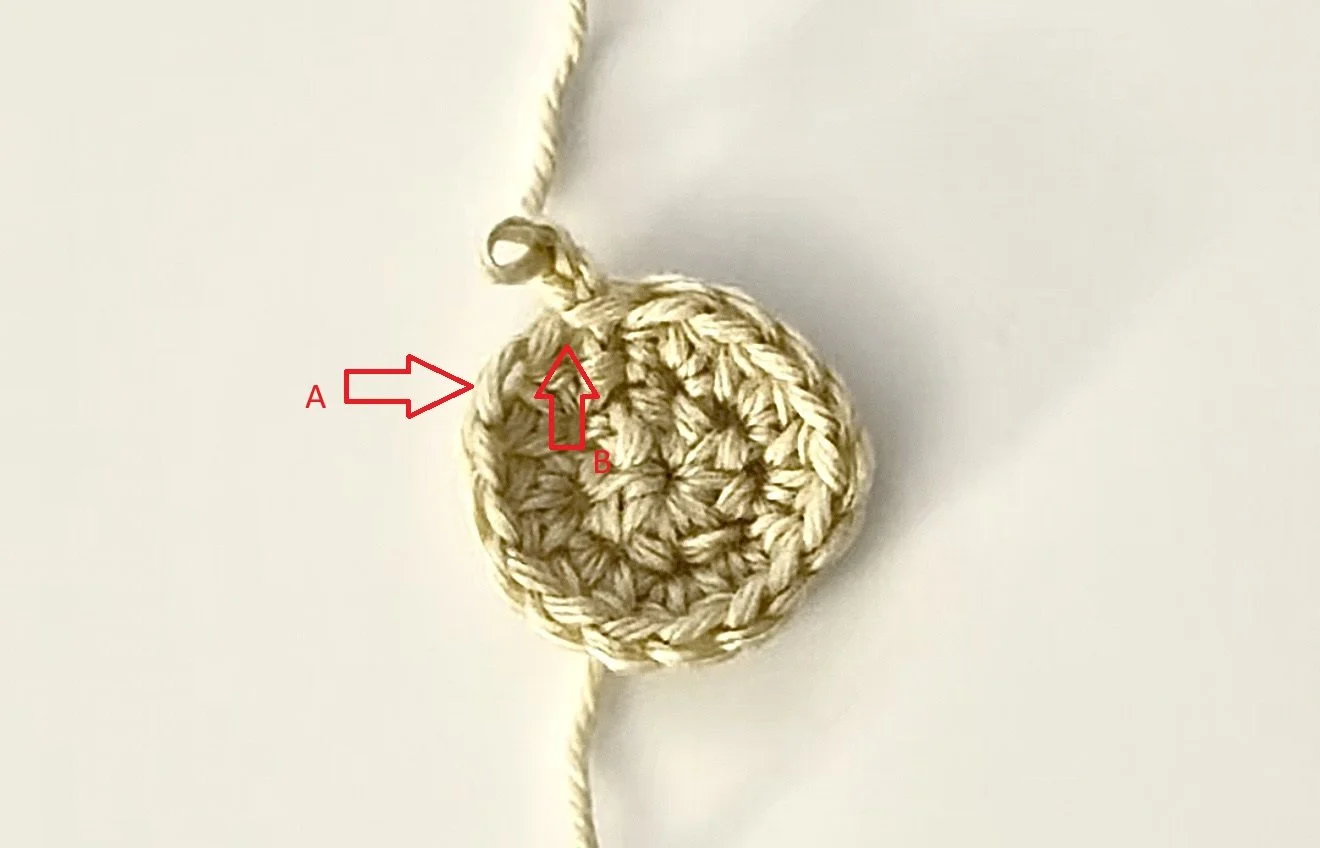
Step 2-Where to place the last HDC of the second round
In this image, you can see where I have placed the final HDC of round two
The space arrow A is pointing to is not a whole stitch, do NOT place a stitch here
The space arrow B is pointing to is where you will place your last HDC on rounds that do not skip the first stitch when starting the round
These are even rounds i.e. round 2, 4, 6, 8, etc.
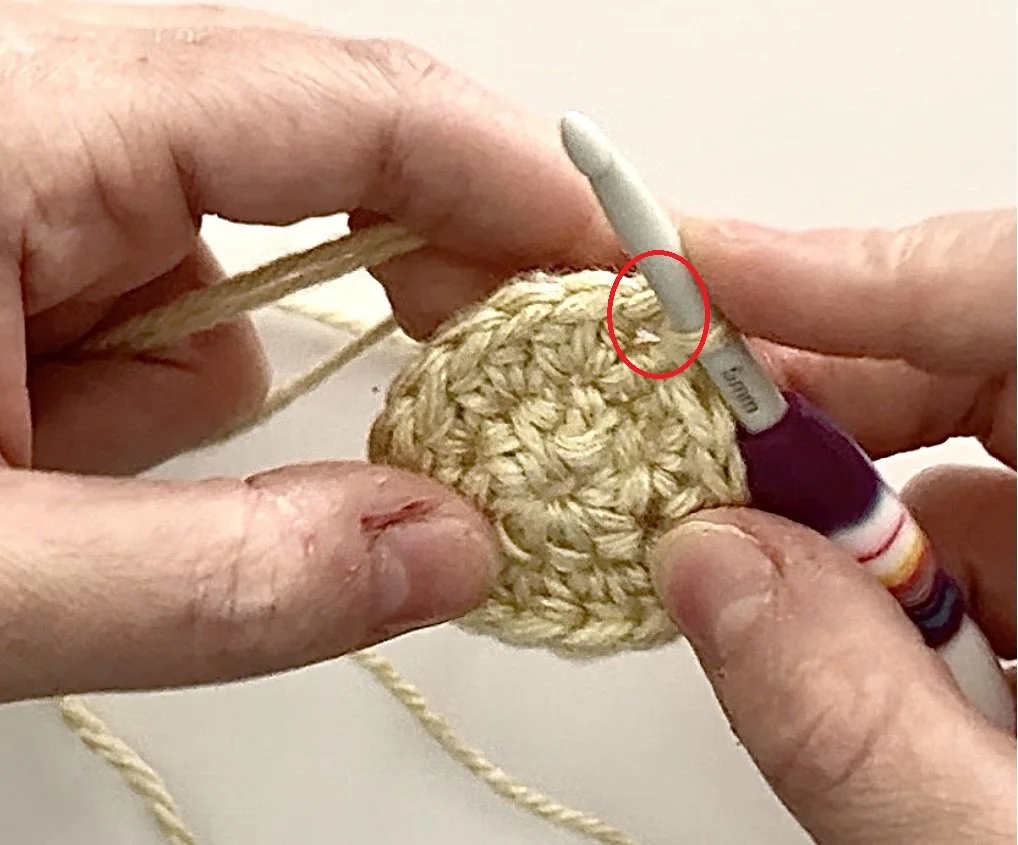
Step 2-Where to place the finishing Sl St of the second round
In this image, you can see where I have placed the finishing Sl St to close the round.
Step 3: Ch2, Sk first HDC; 2 HDC’s in next St, 1 HDC in next St, Repeat from 7 times; 2 HDC’s in next St, 1 HDC in first St of previous round (Same St as previous rows last Sl St), Sl St in first HDC of current round – 24 St total in the round
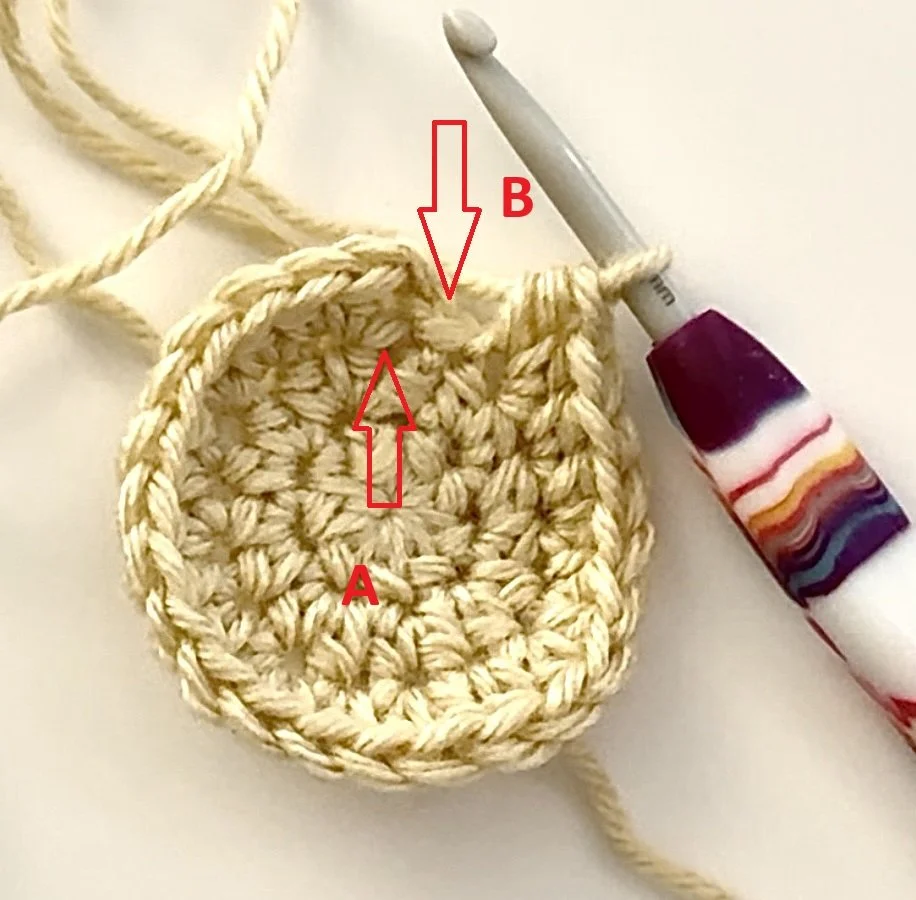
Step 3-Where to place the first HDC of the third round
In this image I am indicating where you are going to place your first two HDC's of round 3
The St arrow A is pointing to is where you are going to place your first two HDC's
The St arrow B is pointing to is the first St in the round, this is the St you placed your Sl St of round two in, and this is the St you are going to Sk for the beginning of round 3
This is also the St you are going to place your final HDC of round thee into, which is why we are skipping if for now.
Step 3-Where to place the last HDC of the third round
In this image I am indicating where you do and do not want to place the last HDC of the round
The St arrow A is pointing to is the first St you skipped at the beginning of the round
The St arrow B is pointing to is not technically a St
You are going to Sk St B and make your last HDC in St A
This is the finishing method you will use on the rounds where you Sk the first St when starting he round
These are odd rounds i.e. 3, 5, 7, 9, etc.
IMPORTANT NOTE: for the remainder of the pattern, you are going to alternate how you begin and end even and odd rounds. This method is going to give you a straight seam instead of a curve.
For all even rounds, you are going to place your first St of the round in the first St of the previous round; and you will place your last St of the round in the last St of the previous round.
For all Odd rounds, you are going to start your round by Sk the first St and placing your first St in the second St of the previous round; and you will place your last St of the round in the first St of the previous round.
If you need a more detailed explanation about how to do this, I have a tutorial on my:
Step 4: Ch2, 2 HDC’s in first St; 1 HDC in each of the next two St’s, 2 HDC’s in next St, Repeat from 6 times; 1 HDC in each of the last two St’s – 32 St total in the round
Step 5: Ch 2, Sk first HDC; 2 HDC’s in next St, 1 HDC in each of the next three St, Repeat from 7 times; 2 HDC’ in next St, 1 HDC in each of the last two St, 1 HDC in first St of previous round, Sl St in first HDC of current round – 40 St total in the round
Step 6: Ch2, 2 HDC’s in first St; 1 HDC in each of the next four St’s, 2 HDC’s in next St, Repeat from 6 times; 1 HDC in each of the last four St’s – 48 St total in the round
If you are making an infant size, Sk to step 11.
If you are making a baby/toddler size, continue to step 7.
Step 7: Ch2, Sk first HDC; 2 HDC’s in next St, 1 HDC in each of the next five St’s, Repeat from 7 times; 2 HDC’s in next St, 1 HDC in each of the last 4 St’s, 1 HDC in first St of previous round, Sl St in first HDC of current round – 56 St total in the round
If you are making a baby/toddler size, Sk to step 12.
If you are making a toddler/kid size, continue to step 8.
Step 8: Ch2, 2 HDC’ in first St; 1 HDC in each of the next 6 St’s, 2 HDC’s in next St, Repeat from 6 times; 1 HDC in each of the last 6 St’s – 64 St total in the round
If you are making a toddler/kid size, Sk to step 11.
If you are making an average adult size, continue to step 9.
Step 9: Ch2, Sk first HDC; 2 HDC’s in next St, 1 HDC in each of the next 7 St’s, Repeat from 7 times; 2 HDC’s in next St, 1 HDC in each of the last 6 St’s, 1 HDC in first St of previous round, Sl St in first HDC of current round – 72 St total in the round
If you are making an average adult size, Sk to step 12.
If you are making a large adult size, continue to step 10.
Step 10: Ch2, 2 HDC’s in first St; 1 HDC in each of the next 8 St’s, 2 HDC’s in next St, Repeat from 6 times; 1 HDC in each of the last 8 St’s – 80 St total in the round
Step 11: Ch 2, Sk first HDC, 1 HDC in each St around, 1 HDC in first St of previous round, Sl St in first HDC of current round
Step 12: Ch2, 1 HDC in first St and each St around
Step 13: Ch 2, Sk first HDC, 1 HDC in each St around, 1 HDC in first St of previous round, Sl St in first HDC of current round
Step 14: Repeat steps 12 and 13 until you reach your desired length of the hat
You can use the following guidelines to determine how many rounds to make for an average hat in each size, (but you can make it as long or short as you like):
Infant Size:
If you are following the pattern steps, this is going to be 14 - 21
If you are counting, this is going to be 10 – 17
Baby/Toddler Size:
If you are following the pattern steps, this is going to be 14 – 25
If you are counting, this is going to be 10 – 21
Toddler/Kid Size:
If you are following the pattern steps, this is going to be 14 – 29
If you are counting, this is going to be 12 - 27
Average Adult Size:
If you are following the pattern steps, this is going to be 14 - 32
If you are counting, this is going to be 12 - 30
Large Adult Size:
If you are following the pattern steps, this is going to be 14 - 36
If you are counting, this is going to be 14 - 36
Step 15: OPTIONAL STEP Ch1, loose Sl St in first St and each St around
*Note: This is going to make the hat tighter around the Brim, if you want to keep it loose, you can Sk directly to Step 16
Step 16: Fasten off and weave in the tails from both ends
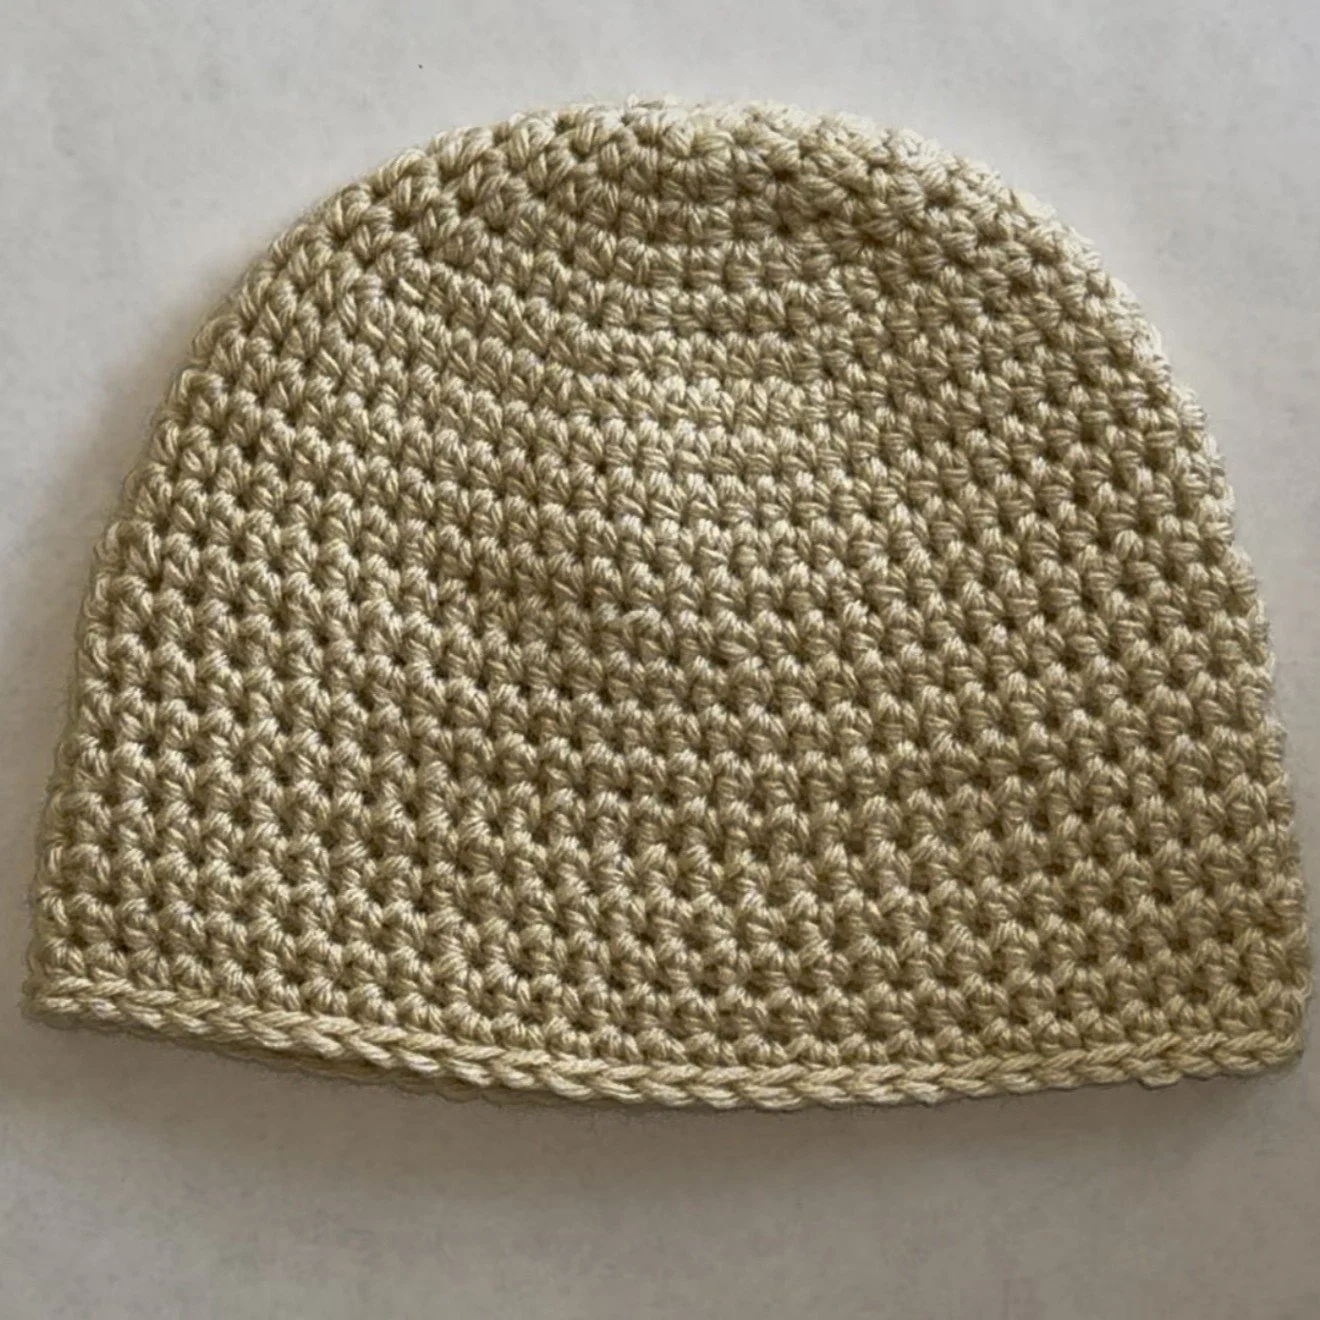
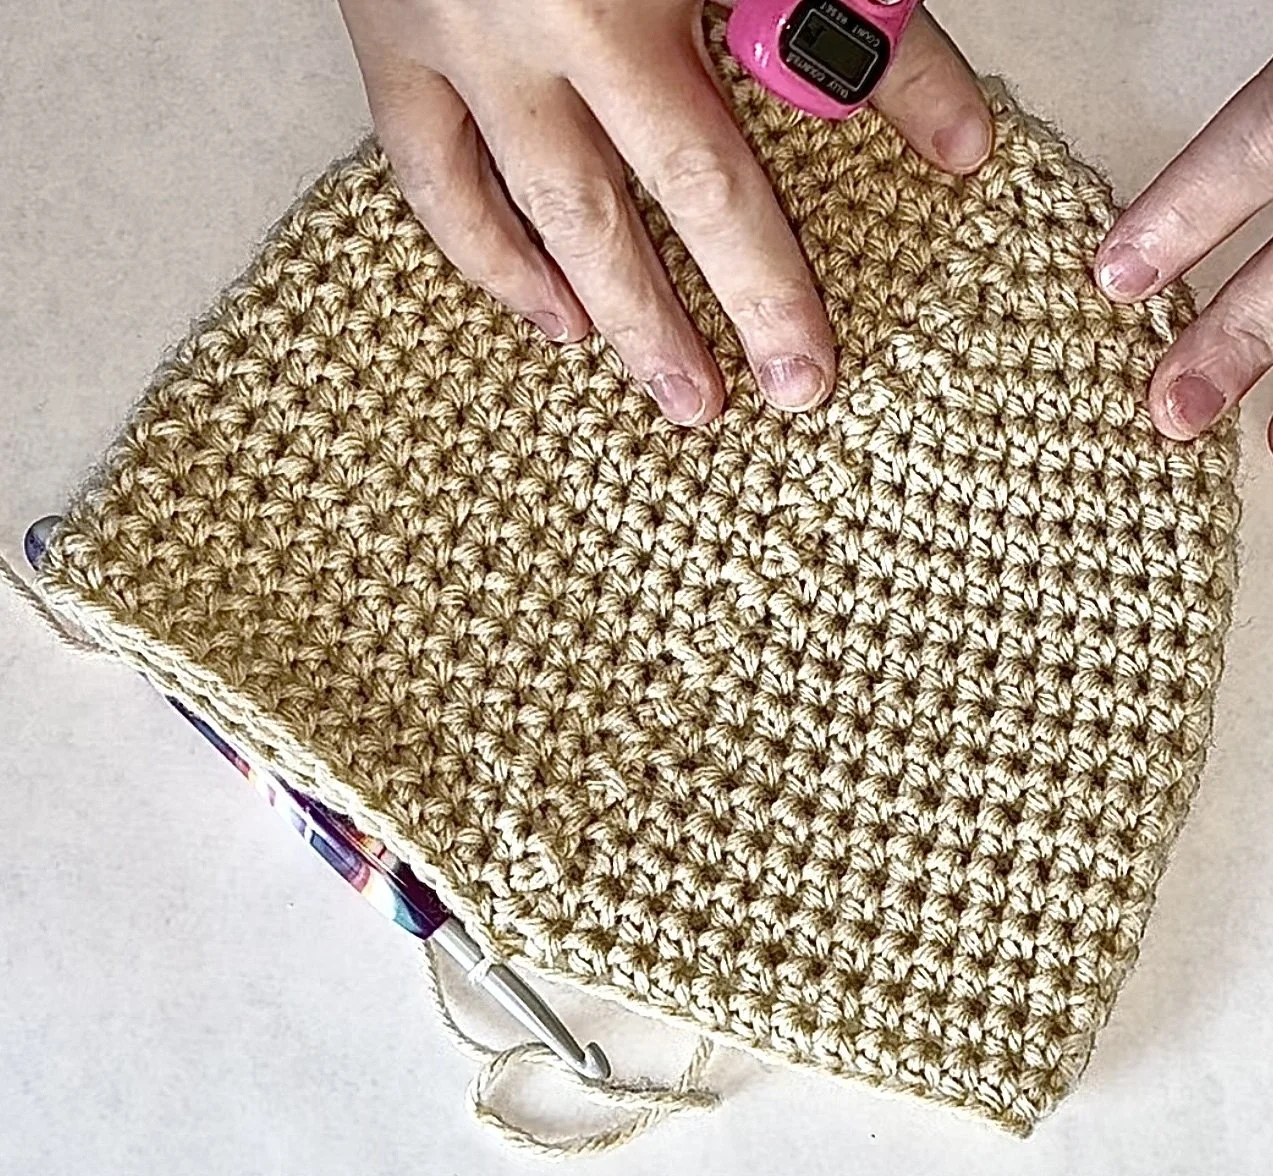
Step 16-Finishing
This is what your finished beanie is going to look like
Nipple
For this portion of the hat, you will need your 5mm crochet hook, yarn in the color you want the nipple to be, and scissors.
Step 1: 5 SC’s in Magic Circle, Sl St in first SC of the round
Step 2: Ch 1, 2 SC’s in fist St (same St as previous rows last Sl St); 2 SC’s in next St, Repeat from 3 times; Sl St in first SC – 10 St total in the round
Step 3: Ch 1, Sk first SC, 1 SC in each St around, 1 SC in first St of previous round, Sl St in first SC of current round - 10 St total in the round
Step 4: Ch 1, 1 SC in first St, 1 SC in each St around, Sl St in first SC of current round - 10 St total in the round
Step 5: Ch1, Sk first SC, 2 SC in next St; 1 Sc in next St, 2 SC’s in next S; Repeat from 3 times; 1 SC in first St of previous round, Sl St in first SC of current round – 15 St total in the round
Step 6: Ch 1, 2 SC in first St; 1 SC in next 3 St’s, 2 SC’s in next St, Repeat from 3 times; 1 SC in last St of the round, Sl St in the fist SC of the current round – 20 St total in the round
Step 7: Ch1, Sk first SC, 2 SC in next St; 1 SC in next St, 4 SC’s in next St, Repeat from 3 times; 1 SC in first St of previous round, Sl St in first SC of current round – 25 St total in the round
Step 8: Ch 1, 1 SC in first St and each St around, Sl St in the fist SC of the current round – 25 St total in the round
If you are making an Infant or Baby/Toddler size, Sk to Step 15.
If you are making a toddler/kid size, continue to step 9.
Step 9: Ch1, Sk first SC, 2 SC in next St; 1 SC in next St, 5 SC’s in next St, Repeat from 3 times; 1 SC in first St of previous round, Sl St in first SC of current round – 30 St total in the round
Step 10: Ch 1, 1 SC in first St and each St around, Sl St in the fist SC of the current round – 30 St total in the round
If you are making a Toddler/Kid size, Sk to Step 15.
If you are making an average adult size, continue to step 11.
Step 11: Ch1, Sk first SC, 2 SC in next St; 1 SC in next St, 6 SC’s in next St, Repeat from 3 times; 1 SC in first St of previous round, Sl St in first SC of current round – 35 St total in the round
Step 12: Ch 1, 1 SC in first St and each St around, Sl St in the fist SC of the current round – 35 St total in the round
If you are making an average adult size, Sk to Step 15.
If you are making a large adult size, continue to step 13.
Step 13: Ch1, Sk first SC, 2 SC in next St; 1 SC in next St, 6 SC’s in next St, Repeat from 3 times; 1 SC in first St of previous round, Sl St in first SC of current round – 40 St total in the round
Step 14: Ch 1, 1 SC in first St and each St around, Sl St in the fist SC of the current round – 40 St total in the round
Step 15: Fasten off with a long tail (This is what you are going to use to attach the nipple to the hat)
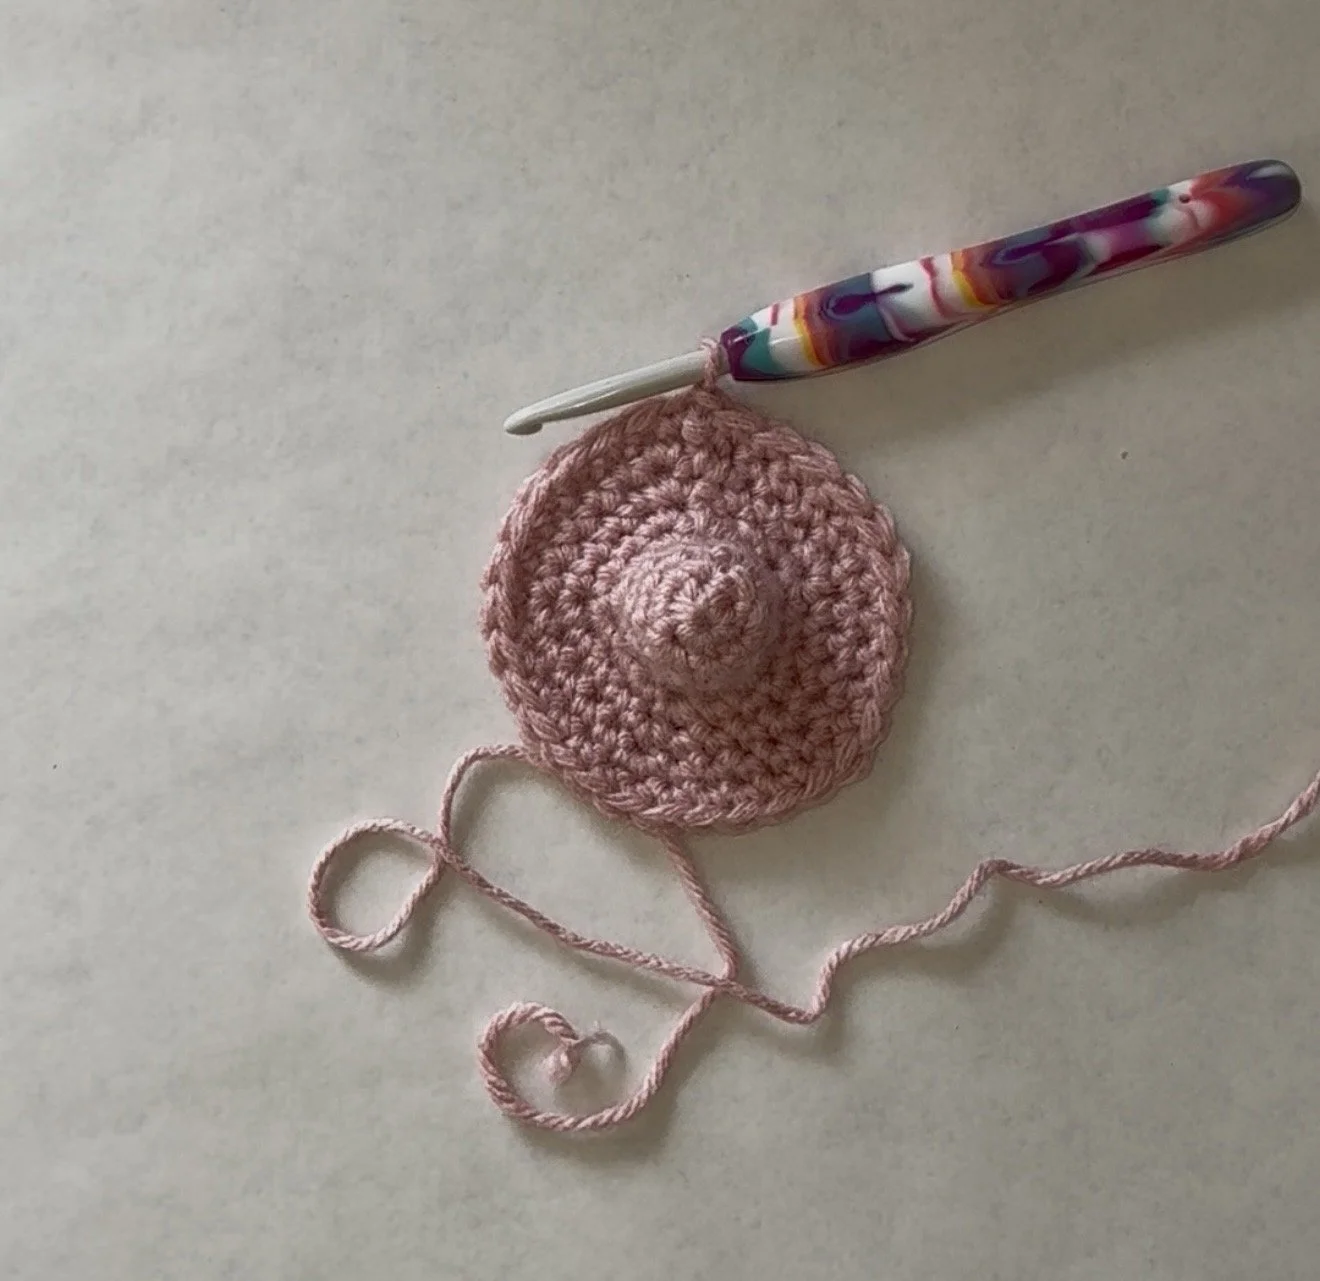
Step 15-Finishing
This is what the finished nipple is going to look like.
Sewing
For this portion of the hat, you are going to need your stitch markers, a tapestry needle, and fiber-fill.
Step 1: Use the stitch markers to attach the nipple to the hat on four sides. I found that the nipple lined up with the specific rounds on the hat for each size:
For both the Infant size and the Baby/Toddler size, sew the edges of the areola to round 4 of the hat.
For the Toddler/Kid size, sew the edges of the areola to round 5 of the hat.
For the Average adult hat, sew the edges of the areola to round 6 of the hat.
For the Large adult hat, sew the edges of the areola to round 7 of the hat.
Important Note: If your stitches are a different tension than mine, then it may not line up perfectly with the guidelines I have listed here, so just stitch the nipple on wherever it lays flat and center on the hat if that is the case.
Step 2: Sew half the edge of the areola to half of the hat.
Step 3: Use the open half to fill the nipple with Fiber-Fill.
Step 4: Sew the remaining edge of the areola to the hat.
Step 5: Once you finish sewing the edges of the areola to the hat, weave the yarn up to the base of the nipple itself and stitch around the base of the nipple to keep the fiber fill in place.
Step 6: Once all the sewing has been completed, weave in the remainder of the tail for added security.

Step 1-Stitch Marker placement
You want to be sure not to stretch the nipple over the hat. It should just sit right on top, and then you will sew it on wherever it sits center